ShredOS: Secure, Verifiable Disk Erasure Using Linux
Summary
ShredOS is a purpose-built, Linux-based tool designed for secure and reliable data destruction. Unlike simple reformatting or even physical damage, which can still leave recoverable data behind, ShredOS performs thorough disk wiping to ensure information is permanently erased. By securely overwriting storage media, it helps protect against privacy breaches, identity theft, and financial misuse when devices are decommissioned or repurposed. ShredOS runs entirely from a bootable USB stick, which can be created on both Linux and Windows systems, making it a practical and accessible solution for secure disk erasure across platforms.
If you’re selling a PC, giving it away, or throwing it out, wiping the drive should be the first thing you do. Simply deleting files isn’t enough, and leaving data behind can give someone access to far more than you expect — from personal photos and emails to saved credentials and online banking information. Taking the time to properly erase the disk is the only way to be sure your data doesn’t end up in the wrong hands.
What is ShredOS?
ShredOS is a lightweight, purpose-built operating system designed solely for secure data erasure. It boots directly from a USB stick and runs independently of whatever operating system is installed on the machine, making it ideal for wiping systems that are being decommissioned, resold, or repurposed.
Under the hood, ShredOS is Linux-based and uses well-known, trusted disk-wiping tools to overwrite storage devices in a controlled and verifiable way. It supports multiple wipe methods and provides clear feedback during the process, so you know exactly what has been erased and when the job is complete.
Because it runs entirely in memory and does not rely on the existing system, ShredOS can safely wipe hard drives, SSDs, and other storage media without interference. The result is a clean device with no recoverable data left behind — suitable for both personal use and more demanding professional or compliance-driven environments.
Why Not Just Physically Destroy Old Devices?
Physically destroying a hard drive might sound like the safest option, but in practice it’s often unnecessary, inefficient, and sometimes unreliable. Simply damaging a drive — bending it, drilling a hole, or smashing the casing — does not guarantee that the data is gone. In many cases, the storage platters or memory chips remain intact enough for data to be partially or fully recovered using specialized tools.
Physical destruction also comes with downsides. It prevents reuse or resale of otherwise functional hardware, creates electronic waste, and can be costly or impractical at scale. For businesses, it also removes the possibility of proper documentation, which can be a problem when data destruction needs to be provable for audits or compliance.
Secure wiping with a tool like ShredOS achieves the same goal without these drawbacks. By thoroughly overwriting the storage media, the data is rendered unrecoverable while leaving the hardware intact, reusable, and verifiably clean.
How to use ShredOS
ShredOS is built on Linux and runs entirely from a bootable USB stick. Since you can’t erase a drive while the system is running from it, this approach lets ShredOS take full control of the hardware without touching the installed operating system. As a result, it can be used to securely wipe PCs regardless of whether they were running Windows, Linux, or something else before.
| Warning |
|---|
| Anything you do from this point on will permanently erase all data on the selected storage device. There is no undo and no way to recover what’s wiped. Make sure any important files are backed up — preferably in more than one place — before you continue. When selecting a disk to erase, double-check that you’ve chosen the correct one and be absolutely certain. To avoid mistakes altogether, don’t even boot ShredOS on a machine you don’t intend to wipe. Accidents do happen. |
Before you begin, read the warning above one more time and make sure you’re comfortable proceeding. Once you’re ready, download the latest standard release of ShredOS from the official GitHub repository. Choose the 32-bit or 64-bit version that matches your system — if you’re unsure which one to pick, refer to our guide on checking your system architecture.
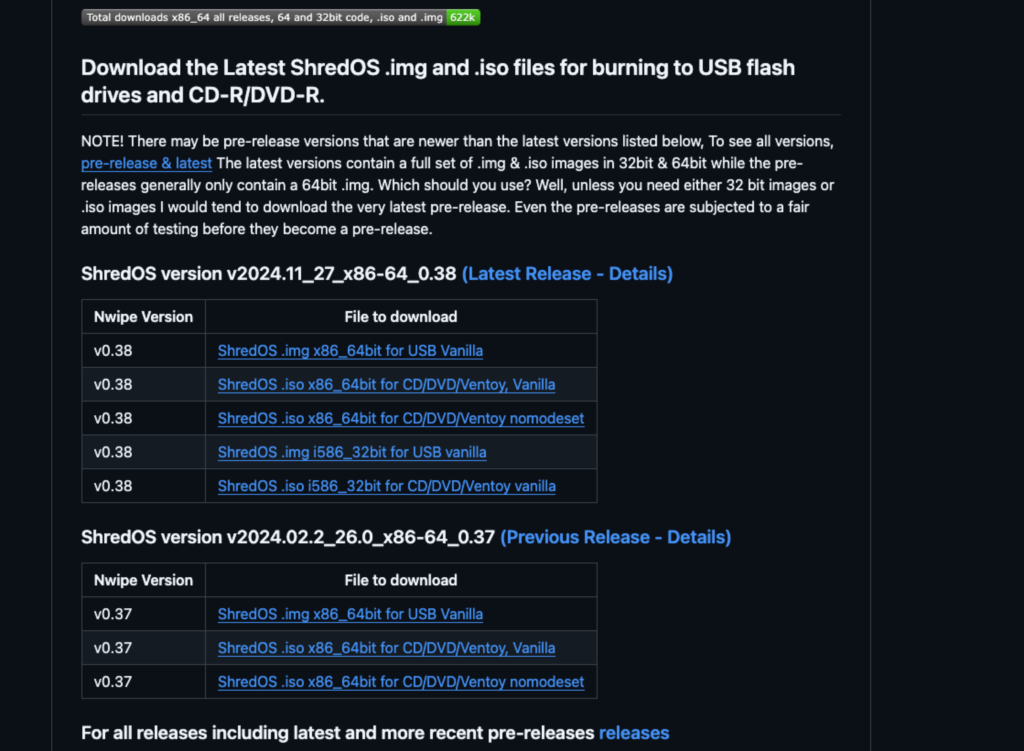
The next step is to put ShredOS onto a USB stick so it can be used to boot the system. Use a USB drive with at least 1 GB of space, and keep in mind that everything on it will be erased during the process. On Windows, a common and reliable tool for this is Rufus, which you can download along with clear instructions from its official website. Using the recommended default settings will create a ShredOS USB stick that works on both older BIOS-based systems and newer UEFI machines.
| Creating the Bootable USB |
|---|
| To run ShredOS, you’ll need to create a bootable USB stick using a tool you’re comfortable with. On Windows, Rufus is a solid choice and widely used for this kind of task. On macOS, balenaEtcher offers a simple, straightforward interface. If you’re on Linux or another Unix-based system, the dd command is more than sufficient for writing the image directly to the USB device. This article does not include step-by-step instructions for creating a bootable USB. The tools mentioned above are well documented, and their official documentation should be followed to avoid mistakes when writing the image. |
Once the USB stick is ready, restart the computer and boot from it. During startup, your system will briefly indicate which key opens the boot menu — often Delete, Enter, or F12. After ShredOS loads, you’ll be taken into the Nwipe interface, which is the tool responsible for erasing the drives. Here you can choose between quicker wipe methods or more thorough ones that take longer to run.
For normal home use, the process is simple. Use the arrow keys to highlight the drive you want to erase, then press the space bar to mark it for wiping. From that point on, all actions will apply to the selected disk.
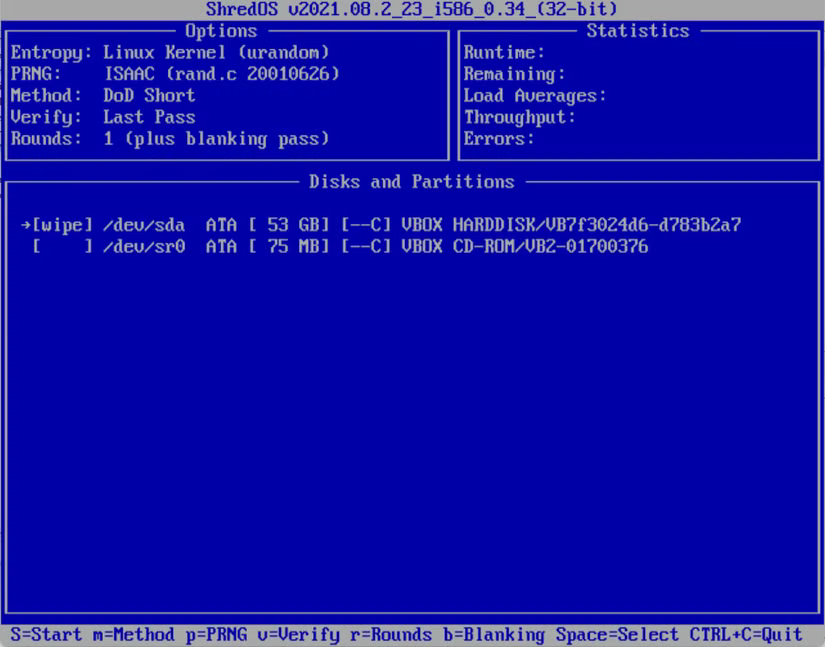
For typical home use, wiping a drive is straightforward. Use the arrow keys to highlight the storage device you want to erase, then press the space bar to mark it for wiping. Once selected, ShredOS will treat that disk as the target for the erase operation.
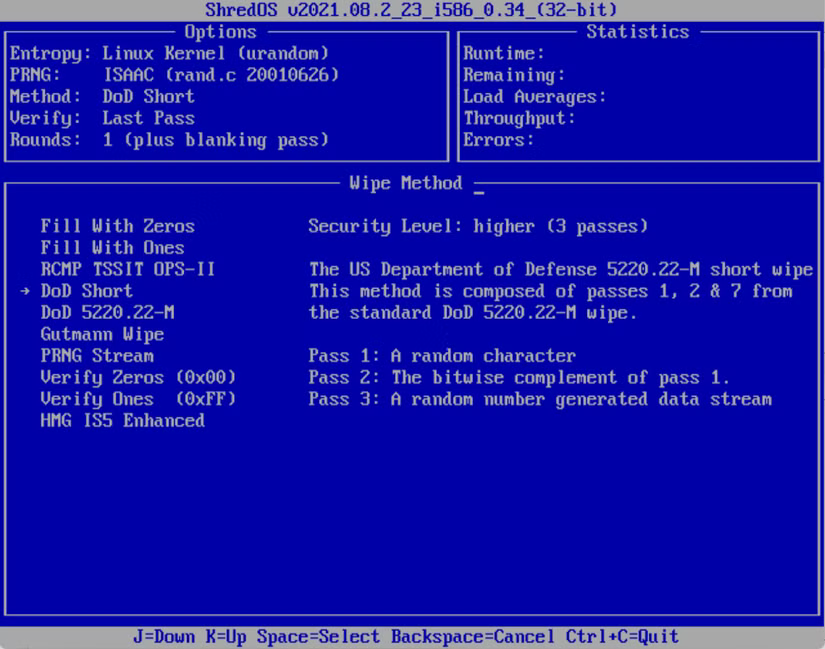
Next, press M to choose how the drive should be wiped and select DoD Short from the list. Confirm the choice with the space bar. If you want to adjust verification, press V — the default setting is usually fine. All available key commands are shown at the bottom of the screen at all times, so you can easily see what can be changed.
For extra peace of mind, I personally recommend using DoD 5220.22-M instead of DoD Short. Be aware that this method is much more time-consuming; wiping a 2 TB drive can easily take more than 24 hours.
When everything looks correct, take a moment to review your selections one last time. If you’re sure the right drive is marked, start the wipe by pressing Shift + S. As soon as you do, ShredOS begins erasing the disk immediately — there are no extra prompts or second chances after this point.
That’s all there is to it. How long the wipe takes depends on the drive’s size and type, so be prepared for it to run for a while on larger disks. When the process finishes, it’s a good idea to reformat the USB stick so you don’t accidentally boot into ShredOS again later.